By Brian Stearns, Alpine SnowGuards
Deep down you know it…winter is lurking right around the corner. The scorching heat of summer is waning and the leaves changing color and fluttering around our lawns (especially up here in Vermont) are very clear indicators of what’s to come.
October means apple picking, drinking apple cider, carving jack-o-lanterns, haunted forests, corn mazes, and Halloween. It also means it’s time to think about getting your roof prepared for winter, as temperatures are dropping significantly during
the overnight hours.
 Whether
your house sports a solar array or not, you need to take care of the roof over your head because, as rings true with most things, preventative maintenance is the key to longevity.
Do it yourself, or hire a professional roofing contractor – the choice is yours – but either way, make sure it gets done. Eliminating winter surprises by following these 10 steps will help ensure you AND your roof enjoy the winter.
Step 1: Start by checking the lid
Sounds obvious, but before moving onto steps 2 thru 10, make sure your roof is in generally good shape. Look for signs like loose shingles, missing sections of roofing, stains, leaks, warped wood, mold, rot, or anything else that might send up a red flag.
Step 2: Inspect and clean those gutters
Look for early warning signs like holes, cracks, and debris and make whatever repairs need to be made. It’s also a good idea to run a bit of hose water through them to make sure they’re still carrying water away from your foundation.
Step 3: Say goodbye to overhanging tree limbs
Take a stroll around your home and see if there are any limbs or branches hanging over, or brushing up against your roof or home. If you do find any sign of this, trim them before winter sets in, and while you’re at it, look for any dead trees and
get rid of them at the same time. Cleaning them up now will help keep your home and roof protected from costly damage that might result from falling limbs.
 Step 4: Pay a visit to your attic
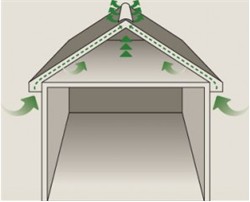
Poor ventilation is a danger to your roof. Adequate ventilation is essential to proper roof function, and allows fresh air into the attic, resulting in stale, moist air being pushed out. If the ventilation is not adequate, you can expect common problems
like mold, mildew, rust, soggy decking, heavy icicles and ice dams. It’s critical to properly ventilate (and insulate) attic spaces to avoid these pitfalls.
Step 5: Replace caulking
Caulking isn’t supposed to become wrinkled, crinkled or cracked. If you see any of that, replace it now.
Step 6: Check Flashings
This one is pretty straightforward – secure any loose flashing and replace all that show signs of damage or leakage, paying special attention to areas around chimneys, plumbing vents, and other roof projections.
Step 7: Chimney inspection & cleaning
Do not skip this step!
It is extremely important to have your chimney inspected and cleaned at least once a year (since we burn wood about 6 months of the year, we clean and inspect ours more like 3 times). Inspections and regular cleanings will help ensure that everything
will function as desired, and will also prevent fires. Trust me when I say this: you’ll feel better knowing you did it.
 Step 8: Install snow guards
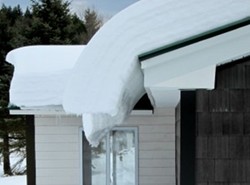
Snow-capped homes seem almost picture-perfect in their charm, but snow is extremely heavy, and can come barreling off your roof suddenly and without warning, causing what is known as a roof avalanche. A roof avalanche can cause irreparable damage to lower
roof areas, gutters, plumbing vents, skylights, pets, cars, landscaping, and most importantly, people. A precautionary measure is the installation of snow guards.
Snow guards are rooftop devices that allow snow and ice to drop off in small amounts or melt completely before falling to the ground, and will prevent the sudden release of snow and ice from a roof, helping to protect those areas below.
Step 9: Keep an eye out for pests
Squirrels, raccoons, mice, and birds may see your home as a welcome relief from the cold weather. While it would be nice to provide all of the animals of the world a respite, they can cause extensive (and expensive) damage to your home and to your roof.
Look for any animal signs or for any areas that a cold animal might like to warm up.
 Step 10: Go inside, and look up
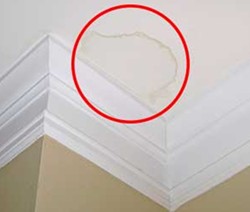
The last step in winterizing your roof actually takes place on the inside of your home. Look up at your ceilings and look for any signs of leaks or stains. It not always easy to tell exactly what caused a ceiling stain, but the location of that stain
can often point to signs. For example if your stain seems to be directly below a chimney, the stain is most likely a direct result of poor flashing. When a stain is apparent along the walls or in corners, it’s usually a result of an ice dam
(which, again, is why it’s so important to ensure your attic is properly insulated and ventilated).
Taking these necessary steps will bring you peace of mind in knowing that the most important part of your home is in good shape and can continue doing the job it was designed for….protecting you and your family from the elements.
Now get out there and enjoy the cooler weather!