 By Scott Moffatt, PPG
This article is the fifth in a series of five articles intended to help architects and other building professionals more effectively color-match architectural metal coatings so that:
1. Building components arrive on the job site coated in the colors specified; and
2. Components produced by different coatings applicators appear as a coordinated whole when installed together on a building.
This article details four steps for proper color matching during panel installation. Click on the following links to read the previous articles in this series: Part 1,
Part 2, Part 3 and Part 4.
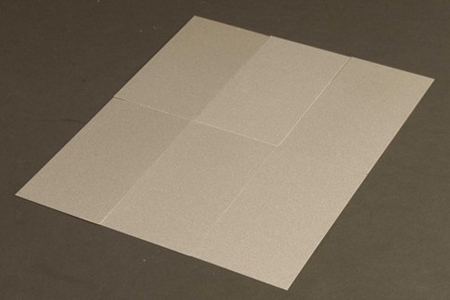
Panel Matching and Directionality
 |
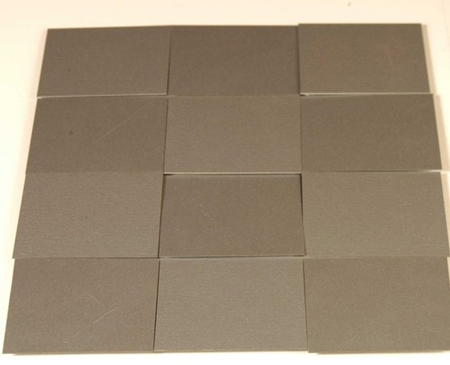 |
The two images above show panels cut from same piece, some positioned against grain, as well as panels from the same batch-and-run oriented in different directions. The presence of micas and metallics will exaggerate these color differences. To
download a complete guide on color-matching metal panels for initial paint application through final installation on the building, visit www.ppgmetalcoatings.com. |
Even when the variables covered in the first four articles of this series are monitored closely, problems can still arise when metal panels are installed that result in a checkerboard appearance. In fact, such problems are more likely to
occur during installation than during any other part of the process.
In most instances, the primary failure is “directionality.” A single panel coated with the same paint may be cut into six different pieces prior to installation. If one or more of the pieces is oriented in the wrong direction, the pattern
of the entire panel can be disrupted.
This effect can be greatly exaggerated in panels and extrusions coated with micas and/or metallics. That’s because the pigments and flakes on a given panel (or collection of panels) will lay in a certain direction. If these panels are cut and laid
“opposite to the grain,” the color will appear incongruent.
For this reason, proper panel directionality during installation is essential. Here are four steps architects and contractors can take to help ensure good panel matching:
1. Instruct the fabricator of any coil coated panels to marks each unit with a directional marking, typically an arrow. This will help the installer orient the panels properly when they are being attached to the building.
2. Avoid putting sheet panels and extrusions in the same plane. Since they are coated using different processes, color matching is difficult. If these components must be in the same plane, design the structure to include a visual break. This will help
mask any color differences that exist between the two elements.
3. When panels arrive on the job site, have the installers inspect and segregate them by color. That way, when the panels are being attached to the building, the installers can use similar colors on specific sections of the building, using lighter colors
on the lower floors of a building, for instance, and darker panels on top.
4. Finally, if two adjacent panels appear to be mismatched, do not install them. Find panels that match or call the architect, contractor or applicator to address the issue.